Croppie.js is an easy to use image cropping plugin that plenty of configuration options. In this tutorial, you will learn how to crop an image using the Croppie.js library and store the cropped image in the server-side using PHP.
Prerequisites
For this tutorial you will need:
- A working PHP environment
- The php-gd extension installed
- Croppie.js
Setting up the HTML Page
We will begin with a simple HTML page that references Croppie’s javascript and stylesheet files:
<html>
<head>
    <title>My cool croppie page</title>
    <link rel="stylesheet" href="croppie.css">
</head>
<body>
    <div>
        <p>Select a file</p>
        <input type="file" id="inputFile" accept="image/png, image/jpeg">
    </div>
    <div id="actions" style="display: none;">
        <button id="cropBtn" type="button">Crop & Upload</button>
    </div>
    <div id="croppieMount"></div>
    <script src="croppie.js"></script>
    <script type="javascript/text">
        // Our javascript logic goes here
    </script>
</body>
</html>
The JavaScript Logic
We will take the file input inside inputFile and initiate Croppie with the file result. When that’s done we will unhide the action div to show the Crop & Upload button which will allow the user to submit the cropped image to the server.
Reading the Image File
let croppie = null;
let croppieMount = document.getElementById('croppie-mount');

function cleanUpCroppie() {
    croppieMount.innerHTML = '';
    croppieMount.classList.remove('croppie-container');

    croppie = null;
}

inputFile.addEventListener('change', () => {
    cleanUpCroppie();

    // Our input file
    let file = inputFile.files[0];

    let reader = new FileReader();
    reader.onloadend = function(event) {
        // Get the data url of the file
        const data = event.target.result;

        // ...
    }

    reader.readAsDataURL(file);
})
We attached a change event to inputFile, when the change event gets called by the browser our code will initialise the FileReader object which allows for our web application to asynchronously read the content of file. We will use FileReader’s readAsDataURL method to retrieve the file data as base64.
Initializing Croppie
Now we need to initialise Croppie into the croppieMount div element once the FileReader finishes loading the file.
reader.onloadend = function(event) {
    // Get the data ulr of the file
    const data = event.target.result;

    croppie = new Croppie(croppieMount, {
        url: data,
        viewport: {
            width: 500,
            height: 500,
            type: 'circle'
        },
        boundary: {
            width: 500,
            height: 500
        },
        mouseWheelZoom: false
    });

    // Binds the image to croppie
    croppie.bind();

    // Unhide the `actions` div element
    actions.style.display = '';
}
This code sets up an event listener to run a function when the FileReader’s onloadend event fires. The event.target.result property contains the data URL of the file that was loaded. The Croppie constructor is then called, passing in the croppieMount variable and the data URL. The viewport is set to 500x500px and the boundary is set to the same dimensions. The mouseWheelZoom property is set to false to prevent the image from being zoomed in when the mouse wheel is used. The bind() method is then called on the Croppie object to attach the image to the Croppie instance. Finally, the actions div element appears.
Sending the Cropped Image to the Server
Now let’s write the the onclick logic for the button. We will send the base64 data of the cropped image to the server.
cropBtn.addEventListener('click', () => {
    // Get the cropped image result from croppie
    croppie.result({
        type: 'base64',
        circle: false,
        format: 'png',
        size: 'viewport'
    }).then((imageResult) => {
        // Initialises a FormData object and appends the base64 image data to it
        let formData = new FormData();
        formData.append('base64_img', imageResult);

        // Sends a POST request to upload_cropped.php
        fetch('upload_cropped.php', {
            method: 'POST',
            body: formData
        }).then(response => response.json()).then((data) => {
            console.log(data);
        });
    });
});
In this code we use the cropBtn.addEventListener() function to listen for clicks on the crop button. When the button is clicked, the code calls the croppie.result() function to get the cropped image result from Croppie. The code then initializes a FormData object and appends the base64 image data to it. The code then sends a POST request to upload_cropped.php.
Server-Side Processing with PHP
We will a create file called upload_cropped.php. That file will process our base64 data, save it as an image and then it will output a server response in JSON.
<?php
// Return content as JSON
header('Content-Type: application/json;');

/**
 * Echos data as json and terminates the script.
 *
 * @param int $http_response The HTTP reponse to set.
 * @param mixed $data The data to output as JSON.
 * @return void
 */
function echo_data_exit($data, int $http_response = 200) {
    http_response_code($http_response);
    echo json_encode($data);
    exit;
}

// If the request method isn't POST then return a 405 HTTP error.
if($_SERVER['REQUEST_METHOD'] !== 'POST') {
    echo_data_exit(['result' => "The method {$_SERVER['REQUEST_METHOD']} is not allowed for this page."], 405);
}

if(!isset($_POST['base64_img']) {
    echo_data_exit(400, ['result' => 'Bad request']);
}

// The path where the image gets saved
$image_path = '/var/www/html/public_dir/image.png';

$data = explode(',', $_POST['base64_img']);
// Decode the base64 data
$data = base64_decode($data[1]);

// Creates a temporary file
$tmp_name = @tempnam(sys_get_temp_dir(), 'image');
// Open for writing only
$tmp_handle = fopen($tmp_name, 'w');
// Write the data to the temporary file
fwrite($tmp_handle, $data);

// Load the image from the temporary file
$image = imagecreatefrompng($tmp_name);
// Save image to the specified path
imagepng($image, $image_path);

// Closes the file handle
fclose($tmp_handle);

echo_data_exit(['result' => 'OK'], 200);
This code saves an uploaded image to a server. The first part of the code checks to see if the request method is POST, and if it’s not, then it returns a 405 HTTP error. The code then splits the base64_img variable on commas and decodes the data. A temporary file is created and the data is written to it. The image is then loaded from the temporary file and saved to the specified path. The file handle is then closed. The last part of the code returns a 200 HTTP response.
Result
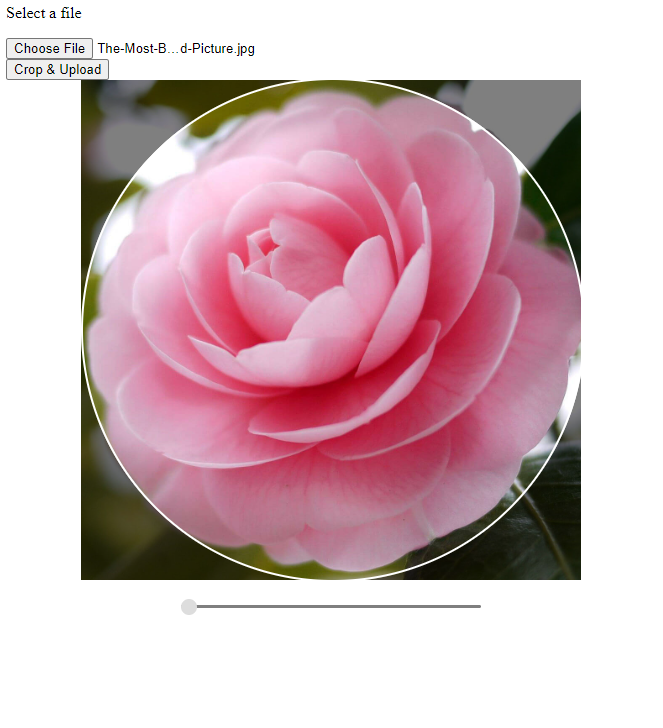
image.png in /var/www/html/public_dir/